


Trying to add and import AVI files to iTunes to play AVI videos in iTunes or sync AVI files to iDevices like iPhone or iPad and More? We often can see the problems about iTunes in some forums or blogs, for example, why my this AVI file cannot be sent to the iTunes? ITunes how to add the AVI file format? This is due to iTunes’ incompatibility with AVI files. Here is a step-by-step guide to convert and import AVI to iTunes on Mac (OS Sierra, OS X El Capitan, OS X Yosemite, Mavericks, Mountain Lion, Lion and Snow Leopard included).
Fortunately, you simply need an AVI to iTunes Converter to convert AVI video to iTunes-friendly format. And, how to convert avi format in iTunes and so on, here are two ways: One is you can use VLC to Convert AVI to iTunes, another is that use a more professional tool for Converting AVI to iTunes on Mac OS Sierra.
Method 1. Pavtube iMedia Converter for Mac- Convert AVI to iTunes on Mac OS Sierra


In order to successfully import AVI movies to iTunes (iTunes 12), you need to convert AVI format to iTunes compatible video like MP4, MOV or M4V. Well, this conversion will be done with ease if you make use of Pavtube iMedia Converter for Mac As a powerful AVI to iTunes Mac Converter can well fulfill your needs. It can convert AVI files to iTunes supported format MP4, M4V, MOV without compressing any video quality. Apart from that, people who want to make changes to the video can easily touch up the video with its built-in editor. Here is the review.
Note: This article is taking “Mac converter” for example, you can download Windows version if you need. If you’re running a Windows, please get the Pavtube Video Converter Ultimate. The way to convert AVI to iTunes on Windows 10 is almost the same. Just make sure you get the right version according to your computer’s operating system.
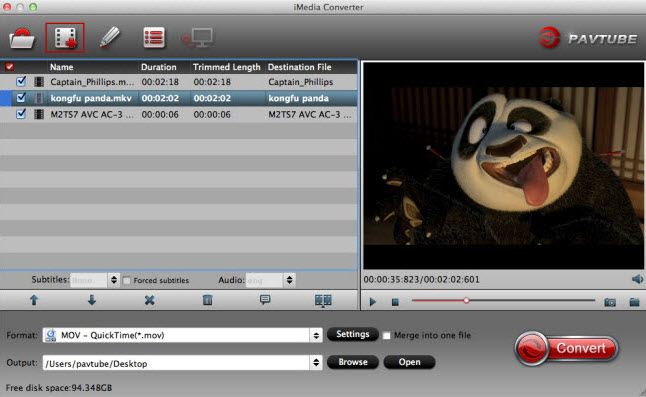
Step 1: Load AVI files
Install and run this AVI to iTunes Mac Converter, add the AVI videos which you want to convert by directly dragging them to the main window of this program. Another way to import files can be done with clicking the Add button. Besides AVI, you can also load MP4/FLV/MKV/Blu-ray/DVD etc to iTunes for further usage.
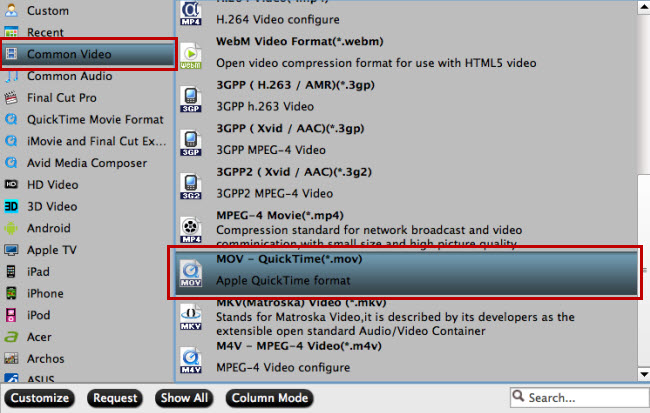
Step 2. Select iTunes supported format
Since iTunes supports MP4, M4V and MOV formats, you can click Format bar and choose any of the three from Common Video as the output file format. If you want to import .AVI to iTunes for playing on iPhone, iPad, iPod, Apple TV, etc., you can also directly select a format from decent device preset like iPad.
Tips: Your original videos comes in several parts and you want to combine them into a single video file for continuous playback? Just turn on the “Merge into one file” option beside “Settings” button, then your video will be merged into one automatically after conversion.
On the other hand, you can also cut a big AVI video file into smaller video clips. In addition, the bundled video editor allows you apply different special effects to your video. Another interesting feature is its ability to rip audio contents from AVI video or other video source to MP3, AAC formats.
Step 3. Converting AVI to iTunes
When everything is OK, simply click the Convert button to begin the conversion from AVI to iTunes format. When the conversion is finished, you can import and play your videos on iTunes or transfer them to iPhone, iPad via iTunes with ease.
Step 4. Import AVI to iTunes library
Now start iTunes and click File > Add File to Library to add the converted AVI files to iTunes library. After that, you can play the AVI files in iTunes smoothly or sync them to your iPhone, iPad, iPod, etc. for playing on the go.
Method 2.VLC—Windows and Mac
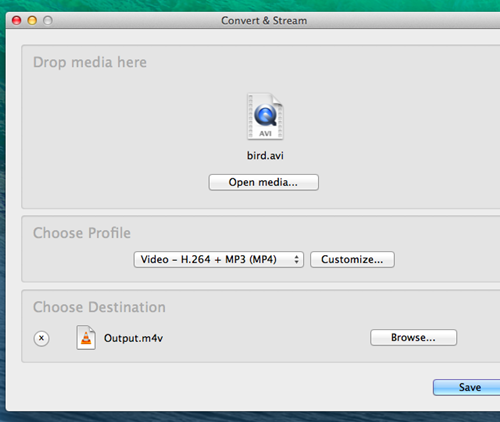
You probably already have the free and open-source VLC media player installed, so why bother downloading another application? VLC is packed with hidden features, and a video converter is one of them. To get started on Windows, click the Media menu and select Convert / Save. On a Mac, click the File menu and select Convert / Stream.
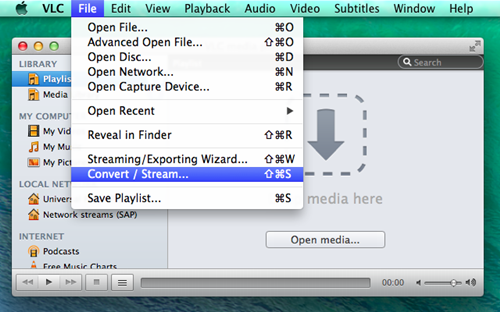
Add the media file you want to convert, ensure the profile is set to Video – H.264 + MP3 (MP4), and save the output to a file. You can also customize the conversion profile settings if you like, but this isn’t necessary. This wizard looks a bit different on Windows, but it’s the same basic process — add a file, choose a codec, select a destination, and start the process. Once VLC is done transcoding the video, you’ll get an MP4 or M4V file you can import to iTunes and transfer to your mobile devices.
Of course, you can use almost any video converter to convert a video file to MP4 format and add it to iTunes. The above options are some of the best, but any video converter will do.
In a word, the method one muet be the easiest way we wanna to introduce to you. Have fun!
Read More:


6 Comments