


Blu-ray/DVD Lovers have the right to enjoy or backup BD movies they purchase, especially when they just wanna keep Blu-ray discs from scratching, or manage their movies in a more convenient way. Do you know 80% Blu-ray/DVD owners will backup their Blu-ray/DVD collections through Mac OS Sierra? Wouldn’t it be great to digitize all of your Blu-ray movies for protecting them from scratches or replaying on computer, tablets, phones, TVs and game consoles without limits?
So, To digitize Blu-ray/DVD collection on Mac, you definitely need to learn how to rip Blu-ray/DVD, rip Blu-ray/DVD to what format is most suitable, and, how to rip Blu-ray yet keep best quality. This guide will detail the easiest way to convert Blu-ray/DVD to digital MP4, AVI, MKV, FLV, etc video formats.
Best Blu-ray/DVD Ripping Software to Rip Blu-ray to Digital files on Mac
If you’re also seeking for the best video output quality, fastest video conversion speed, and the most formats supported, Pavtube BDMagic for Mac/Pavtube BDMagic will be your best choice. It’s an intuitive cross-platform tool to rip, convert, backup DVDs and Blu-rays in one place. Besides, The NEW Pro version also enhances Directly Copy 3D Blu-ray viewing experience and original audio quality, added more media formats support, improved player performance with better hardware acceleration, refined online video support functionality. It can be fully compatible with Mac OS X, including the latest Mac OS X 10.12 Sierra. <review>.
This Blu-ray Ripping tool also offers enough freedom for all movie lovers like you to back up your favorite Blu-ray and DVD movies in a personalized way. Two different copy modes: Title Mode and Full Disc Mode are provided to let you copy the exact movie part you want. Besides, if you want to lossless backup your Blu-ray/DVD video files with all multiple audio and subtitle tracks, try Pavtube ByteCopy for Mac.
Key features of BD Magic for Mac:
* Rip the latest Blu-ray/DVD including 3D blu-ray on Mac
* Directly Copy Blu-ray/DVD main movie with multiple audio and subtitle streams
* Convert Blu-ray/DVD to a variety of video formats
* Full Disc Copy Blu-ray/DVD’s original file structure to BDMV folder
Ready Free Try and Buy This Top Blu-ray/DVD Ripper?


Step-by-Step: Digitize Your Blu-ray/DVD Collection with BDMagic for Mac
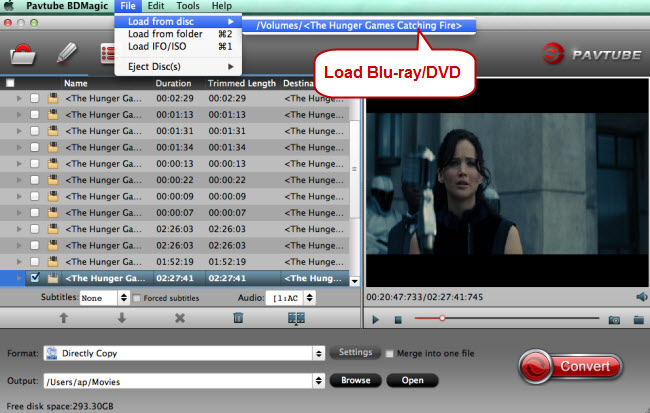
Step 1. Load Blu-ray/DVD discs.
Run Pavtube BDMagic for Mac and import disc. A Blu-ray drvie is needed for Blu-ray ripping. Click this icon to load disc from ROM, IFO/ISO or folder. I also noticed if you have a ISO file to import, it will recognize the ISO file automatically with no need to run virtual driver and mount ISO files firstly. Good design.
Step 2. Choose output format.
Click “Format” drop-down list and choose proper format for different using.
For instance, if you simply want to back up Blu-ray/DVD to external hard drive, here are two solutions:
1. Click the “computer” icon on the top to output 1:1 Blu-ray/DVD file exactly the same as original.
2. Select “Copy>Directly Copy” in format list to output an intact m2ts file of the main title.
For watching on Home theater PC, TV and other android and apple tablets, you can choose “Common Video > H.264 Video(*.mp4)” or “HD Video > AVI HD Video(*.avi)”, it’s well compatible with your TV and Tablets.

Step 3. Change video specs. (Optional)
If you are not satisfied with default specs, then click “Settings” to enter Profiles Settings windows. You can customize video frame rate, bitrate, size and other settings freely.
(It does not work for directly copy)
Step 4. Start conversion.
Click the big red “Convert” to start backing up or converting your Blu-ray/DVDs. Usually backup will be quicker because it does not need to do trancoding.
After the conversion, click “Open output folder” to quick locate converted files. Connect your hard drive to computer and transfer them into it.
Pavtube BDMagic for Mac works easily and at high efficiency. Digitizing Blu-ray/DVD Collection on Mac is no long the complicated thing. Now take time to enjoy it.
Additional Tips: Before Digitizing Blu-ray Library throug Mac OS Sierra
Here’s a few steps to making your extensive (and expensive) Blu-ray/DVD collection digital through Mac OS Sierra, and preserving it for years to come.
A: Get an External Hard Drive
To save movies and TV shows, you’re going to need a lot of space. You don’t want to keep everything on your standard computer hard drive, because what happens if your computer crashes? You’ll lose everything. With an external drive, you can take it with you and plug it into any computer with a USB drive.
I find Western Digital to make some of the most durable hard drives, but you can use just about any brand to do the job. For your standard collection, you’re probably going to want at least a terabyte of space. Learn >> Backup Personal Media Library to NAS Server.
B: Get the Best Size Hard Drive for Easily Digitize Blu-ray/DVD
Some users worry about the lack of hard drive capacity to store the digital Blu-ray content. Actually, you can calculate your needed space like this: (number of DVDs X 4.3) + (number of blu-rays X 27) = total amount of GB of hard drive space you’ll need. This formula is suitable for 1:1 copying Blu-ray without any quality loss, but accordingly, the size of video files will be pretty big. And if you want to digitize Blu-ray collection to smaller size video files, you can choose a compressed video format (MP4, AVI, FLV, etc.) as output file format in order to save more storage space and time. Certainly, there is some loss in quality.
C:So Many Choices, which One is BEST for Ripping a Blu-ray?
In fact there is no standard for the best Blu-ray ripping output. It is what is most suitable that counts. If you need high compression to save hard drive space, then you can rip Blu-ray to AVI. If you pursuit high quality, then rip Blu-ray to MP4 can hold sharpest image for you. Ripping Blu-ray to MKV is the compromising solution.
D: How To Digitize DVDs
The steps for DVDs and blu-rays are different. We’ll start with DVDs.
1. Insert the DVD into your DVD player in your computer.
2. Use your DVD player software to play the movie. Just play it for two or three seconds, then close the software.
3. Launch Smartripper. When it’s done loading, click Settings, and make sure max-filesize says 9999 (so it doesn’t chop up the movie into multiple little files) and file-splitting says “max-filesize”. Click OK.
4. At the bottom of the screen, choose the folder you want the movie saved in, then click start.
5. Your movie will be copied to your hard drive. It takes about 10 minutes.
6. When done, close the software and go to the folder you specified. You’re looking for a file with the extension VOB that will be between 3 and 6 GB in size. That’s your movie. Rename it to the correct movie name, and test it by double-clicking it and running it in VLC Media Player. If it plays and sounds good, you’re done! Rename the file to the correct movie name and copy it to your removable hard drive.
8. It’s possible that you may be hearing the wrong sounds when you play the movie file. Just right-click in the middle of the screen, then click Audio, Audio Track, and pick a different track. One of them should be the correct one.
9. Done! Rinse and repeat with all of your other DVDs. Then enjoy your new 100% digital movie collection.
E: How To Digitize Blu-Rays
1. Put your blu-ray movie in your computer and then launch DVDfab.
2. Once the software is done “opening” the blu-ray (takes about a minute), click Copy then “Main Movie”.
3. On the audio entry on the same line of the highlighted movie, click it and see if there are other audio tracks checked. If there are, check the blu-ray box and see if there are commentaries. If there are not, un-check all other audio except for the main track.
4. Click “Save To” at the bottom of the window and point to where you want the digitized
movie file. Remember, this sucker is going to be about 30 GB so make sure you have room on your hard drive before doing this!
5. Click Start. The copy will take about an hour or so. Close the software when its done.
6. Go to the folder you specified. There will be a lot of strange subfolders, but the one you’re looking for is “Stream”. In there will be a file that is much larger than the rest, about 30 GB in size. Test it by running it in VLC Media Player. Then rename it correctly, and copy it to your collection.
7. Done! Repeat with your other blu-rays.
When you’ve completed this, you’ll have every movie you own on a removable hard drive that you can simply click and play whenever you like on any computer in your house. You could also share this over a home network if you know how to do that. Nice!
Source: http://www.sublimeyourtime.com/2014/04/16/digitize-life-part-four-dvds-blu-rays/
Editor’s Note: For personal use, anything is legal. But if you want to distribute it, it’s illegal. You have acquired that Blu-Ray/ DVD in a legal way. So now, if you want to have a copy of it on your own PC, no one’s going to stop you. It’s a common sight to see people sell Blu-Ray-ripped copies on the street, which is illegal. But if you want to keep your ‘copy’ to yourself, no one will stop you.
Read More:


