A commercial Blu-ray disc do not always include one subtitle. If you have collected lots of Blu-ray movies, you may have clues to do Blu-ray ripping job. Well, do you know how to convert Blu-ray with your preferred subtitles? When ripping Blu-ray movies, you may want to keep the right subtitles for foreign films so that you can better understand the movie. Then how to rip Blu-ray with the right subtitle on Windows 10/8.1/8? In this article, we’ll show you an easy way to rip Blu-ray with subtitles for easier storage or playback.

See also: How to obtain forced subtitles only from a DVD/Blu-ray movie
To watch Blu-ray movies with subtitles you need on media devices like iPad, Galaxy Tab, Apple TV, etc, you need a Blu-ray ripper that supports keeping subtitles when ripping and compressing Blu-ray files. Pavtube BDMagic is highly recommended to help your convert your Blu-ray movie to AVI, MP4, WMV, MKV, FLV, MOV, etc. with selected subtitles. Moreover, with advanced disc decryption technology support, high converting speed and smooth ripping process will be presented. Read the review.
Note: For Mac users, Pavtube BDMagic for Mac is a specialized program that aims at providing the best solution to convert Blu ray with subtitles on Mac OS (Sierra included). Download the right version and have a look at how it works.
Step-by-Step: Rip Blu-ray with subtitles easily and fast on Windows 10/8.1/8
Note: For Windows users, just follow the detailed guide to complete your conversion. The way to convert Blu-ray movies on Mac OS Sierra is the same. Just make sure you’ve downloaded the right version.
Step 1: Add Blu-ray movies
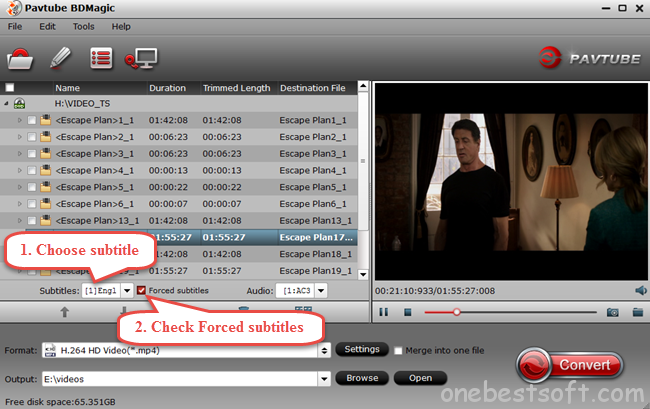
Insert your disc to your Blu-ray drive, and launch the Blu-ray Ripper; click the disc button to import your Blu-ray movies to the program.

Step 2: Choose preferred subtitles
To convert Blu-ray movies with subtitles contained, just simply click “Subtitles” and select the one you prefer. (And you can also choose the audio track as you like.)

P.S. You can also choose to show forced subtitles as you want. Learn how to rip Blu-ray with forced subtitles.
Step 3: Select output format
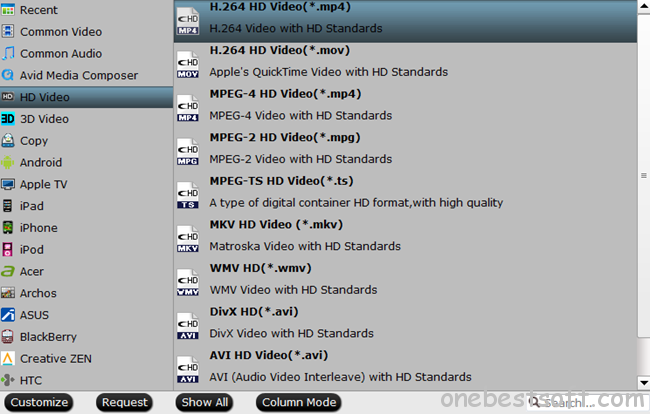
Click the Format bar and go to the Profile column, choose MKV, AVI, MOV, MP4, etc as the output video format in the category of “Common Video”. You can also find lots of optimized profiles for many popular portable media devices including e Nexus 7, Galaxy Tab, Apple TV, iPad and more.

Step 4: Start Blu-ray conversion
Press the big “Convert” button to start ripping Blu-ray with subtitles. After the conversion, get the outputs to play on your computer or stream to kinds of media devices for playback with your wanted subtitles at ease.
Now, you can Enjoy your favorite Blu-ray movies with the right subtitles on Windows 10/8/8.1 and so on. Have a good time!
Note: if you’d like to keep multiple subtitles and still obtain forced subtitles only, choose either MakeMKV or Pavtube ByteCopy for BD/DVD ripping. Both allows for multiple subtitles and forced subtitles when enveloping a whole movie to MKV container. Both VLC player and XBMC show subtitles when playing the MKVs on PC.
Read More:


5 Comments