With the Cinematic Mode offered by PlayStation VR, you can now get the chance to play non-VR games, watch films, browse the internet and use applications while wearing the headset. A recent PS4 firmware update also gives you the chance to watch stereoscopic 3D on your PSVR headset. This effectively turns the PlayStation VR into your personal 3D TV and without the need for expensive battery-powered glasses for viewing content. The following article will show you how to find and make 3D movie for PlayStation VR.
Where to find 3D movie for PlayStation VR viewing?
Although there are more and more VR Headsets that gives you the chance to view movies with 3D effect, the sad fact is that 3D movie source is so limited. You can’t rent 3D movies from Netflix, or your local Redbox kiosk, nor can you stream or download them from Amazon or iTunes. The good news is that there are a few source that can deliver 3D goodness to you either through the mail or over the Interwebs. Following are your options:
3D-BlurayRental.com
Comcast Xfinity 3D
Sony PlayStation Network
Vudu
Unfortunately, many of the titles are available only for purchase, with prices typically set at $21.99. And a lot of the best 3D flicks aren’t there, including “Despicable Me” and “Hugo.”
Watch 3D Blu-ray on PlayStation VR
For those people who wish to get the best picture and sound quality, then renting or buying a 3D Blu-ray disc would be your best choice. The good news is that you can now watch 3D Blu-ray movies through PlayStation VR with no additional settings or features. To successfully view 3D Blu-ray on PS VR, make sure to update your PlayStation 4 to System Version 4.5 and the PlayStation VR to System Version 2.5.
Create 3D Movies for PlayStation VR
Apart from above listed 3D source content, you can also turn your personal media source into 3D movie format for PlayStation VR viewing. Here, you can get the job easily done with our powerful yet simple to use 3D Movie Converter for VR Headsets – Pavtube Video Converter Ultimate. The program not only helps to make PlayStation VR compatible stereoscopic 3D movie (or Anaglyph 3D) from commercial 2D Blu-ray/DVD with complicated copy protection and region code, but also from digital 4K/2K/HD/SD file formats in virtually any file formats.
Adjust output profile settings
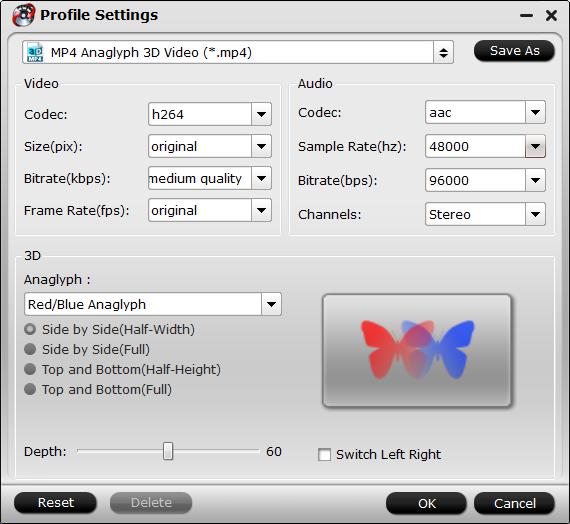
To get better 3D visual effect, you can flexibly adjust output 3D profile settings in the program’s “Profile Settings” window. You can switch between “Red/Blue Anaglyph” or “Red/Green Anaglyph” or adjust output video/audio encoding settings such as video codec, bit rate, frame rate, file size, audio codec, bit rate, sample rate, channels, etc according to your own needs.
Related article: Play 3D Movie with VLC | Play 3D Movies with HTC Vive | Create 3D SBS Video for Gear VR
For Mac users, you can download Pavtube iMedia Converter for Mac to create 3D movies for PlayStation VR from all your media source on macOS High Sierra, macOS Sierra, Mac OS X El Capitan, Mac OS X Yosemite, etc
|
Get Pavtube Video Converter Ultimate for Windows/Mac with 20% off discount, coupon codec: 45K2D47GJH
|
Step by Step to Create 3D Movies for PlayStation VR Playing from 2D Blu-ray/DVD/Digital Video
Step 1: Input Blu-ray/DVD or digital video.
Start the application on your computer. For loading digital video, click “File” > “Add Video/Audio” or “Add from folder” (batch load multiple files) option. For loading Blu-ray or DVD disc, Insert your Blu-ray or DVD disc into your computer’s optical drive , hit “File” > “Load from disc” option.

Step 2: output PlayStation VR supported 3D format.
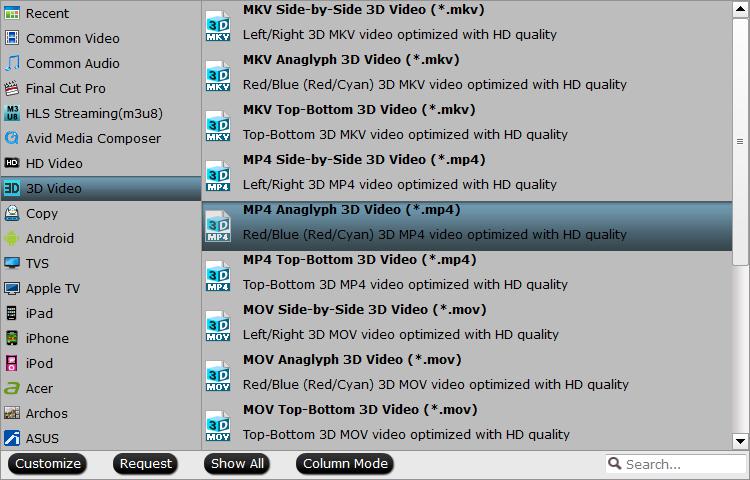
Clicking the Format bar, from its drop-down list, select PlayStation VR supported stereoscopic 3D format “MP4 Anaglyph 3D Video(*.mp4)” under “3D Video” main category.

Step 3: Adjust output 3D profile settings.
Click “Settings” on the main interface to open “Profile Settings” window, here, you can flexibly change output 3D format video and audio profile parameters including video codec, resolution, bit rate, frame rate, audio codec, bit rate, sample rate, channels, etc as you like or switch between “Red/Blue Anaglyph” or “Red/Green Anaglyph” mode according to your own needs.

Step 4: Begin the conversion process.
After all setting is completed, hit the “Convert” button at the right bottom of the main interface to begin to create 3D movie for PlayStation VR from Blu-ray/DVD/video files.
When the conversion is finished, click “Open Output Folder” icon on the main interface to open the folder with generated files. Then all you have to do is just turn your PS4 on, plug in your headset and you’ll immediately be able to view the 3D movie with PS4 menu through the visor in cinematic mode.


