


FreeNAS is a powerful, flexible home storage system – configured by you, for your needs. Whether it’s streaming music and movies, backing up a desktop, or syncing files over the web, FreeNAS provides the tools to help you build the perfect file storage appliance for your home! While, if you are looking for a way to backup DVD to FreeNAS for viewing as above thread mentioned, read on to find the best solution. 
As you know, FreeNAS doesn’t support DVD video format. If you have some nice DVD movies and want to put to FreeNAS for streaming and playback on DLNA compliant devices like PS4, WD TV, Xbox, Roku, Plex, iPhone, TV and more media devices, you have to convert DVD to format like MP4, MKV or other format compatible with FreeNAS.
* Read: Upload H.265 videos to NAS | Move iTunes Videos to NAS | Blu-ray to FreeNAS…
There are many DVD ripping applications available designed to rip and convert DVDs for FreeNAS. Pavtube DVDAid is one of the dynamic DVD ripping tool that can help you achieve the goal effortlessly- rip DVD/Blu-ray to a common video with high output video quality and fast ripping speed. This DVD converter can help you convert DVD to all other popular video formats like MP4, AVI, MOV, MKV, WMV, FLV, MPG, etc. for playing and sharing bypassing the DVD copy protection.
Besides, it provides the optimal presets for iPhone, iPad, PS4, Xbox, Microsoft Surface RT/Pro, etc Android, iOS, Windows based devices. Moreover, you are allowed to edit the DVD movies by trimming, cropping, adjusting video effects, etc. to get the very wanted part and effects as you like. The equivalent Mac version is here for Mac OS X . Just get it now and follow the steps below to copy DVD movies to FreeNAS for unlimited sharing.


Part I. How to rip DVD to FreeNAS Home Server friendly video for streaming
Step 1. Load DVD movies
Insert the DVD disc into your computer’s DVD drive and run DVD Ripper. You can click the “Load DVD” button to load the DVD files to the program. DVD ISO/IFO, VIDEO_TS folder are supported also. 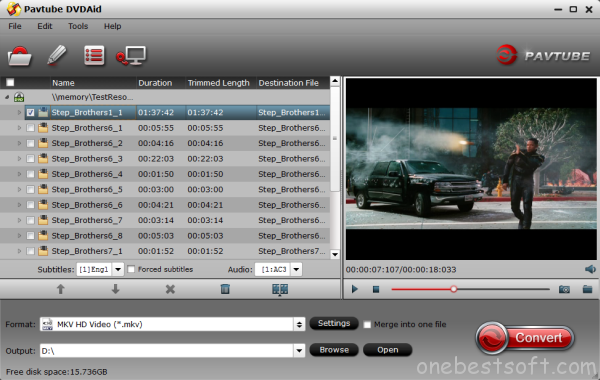
Step 2. Specify output format
As has been stated above, FreeNAS supports MP4, MKV, M4V, etc video files. So you can just select “MKV HD Video (*.mkv)” or “H.264 HD Video(*.mp4)” from “HD Video” as the output video format. 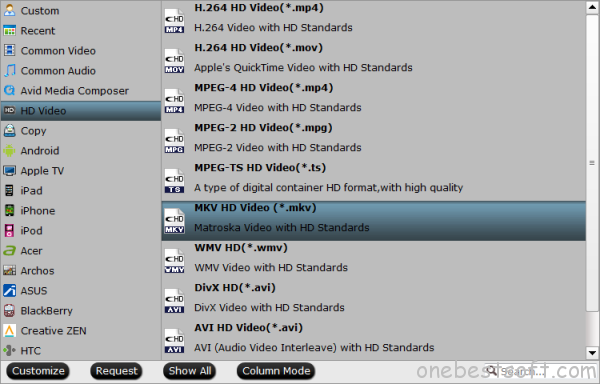
Step 3. Trim/Edit DVD files
Since FreeNAS has limitations about the uploading video size (If you only have the free account, you only have 2 GB of space), please pay attention to the video size when ripping DVD movies for FreeNAS. Here we should highlight the trim function on this software. Just click “Edit” to trim the DVD videos to get the very part you want. Besides trimming, cropping, adding watermark, adjusting special effect, are well supported as well.
Step 4. Start converting DVD to FreeNAS
When all these settings are ready, you can click the “Convert” button to begin the DVD to FreeNAS conversion. When the ripping is done, you can click on “Open” button to locate the ripped videos.
Part II. How to load video to FreeNAS
Installing FreeNAS
FreeNAS stores the operating system on a USB thumbdrive and copies the OS from the thumbdrive to RAM at boot time.
Installing FreeNAS is a multi-step process. First, you need to burn the installation ISO onto a USB thumbdrive or a DVD-ROM. Then, you to make sure both the installation medium and the thumbdrive you’re going to install the OS on are plugged into the machine, and that the BIOS is set to boot the machine from the installation media. After the machine boots, you’ll need to answer a couple of prompts, including selecting the proper drive for installation. It’s OK to do the install with your hard drives disconnected if you’re worried about accidentally installing FreeNAS on one of them instead of your thumbdrive.
Wait, what? You’re supposed to install the OS on a USB thumbdrive? Indeed you are. FreeNAS stores the operating system on a USB thumbdrive and copies the OS from the thumbdrive to RAM at boot time. Once it’s booted, it connects to the filesystem on your hard drives. The beautiful thing about this approach is that your FreeNAS install isn’t tied to the hardware in any particular machine. To move your FreeNAS install to another machine, you just need to move the hard drives and thumbdrive, set the BIOS to boot from the thumbdrive, and your server will be back up and running in no time.
Once you’ve been through the initial install, FreeNAS will prompt you to reboot the computer. When it reboots, you’ll be presented by FreeNAS’s console menu. At this point, you can point your web browser to the IP address FreeNAS lists at the bottom of the screen. If everything is working properly, you’ll see a login prompt for the FreeNAS web interface. (If it doesn’t, you may need to use the console to configure your DNS server and default gateway.) 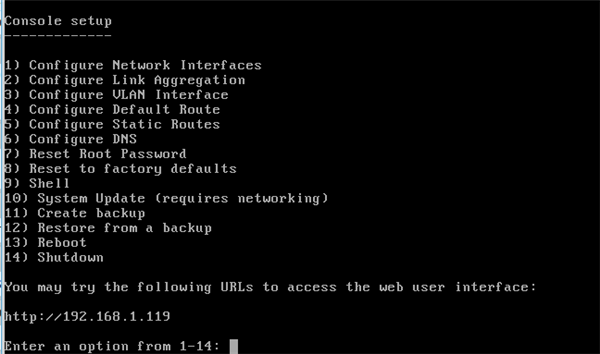
After you change the default password, FreeNAS presents you with the initial configuration wizard. While you can skip this process, I recommend walking through it, as it will help you set up a ZFS pool with decent default settings and create your first few network shares.
There are a few things you should know before you jump in. The first is that ZFS, while incredibly powerful, is unlike the filesystems you find on desktop OSes. To get the most out of ZFS, you really need to span the filesystem across multiple disks. Each group of disks is called a pool, and while FreeNAS will let you have multiple pools in your system, you probably only need a single pool for a home server. ZFS lets you configure the redundancy level for a set of drives at the pool level. While I generally recommend using a using a striped pool and backing up your data regularly instead of a mirrored setup, if you have the hard drive space, mirroring will help you recover from a dead hard drive faster than backups.
Inside each pool you can add datasets. Datasets in ZFS are roughly analogous to folders in more traditional filesystems; however, each dataset can have unique settings for quotas, permissions, and other features. I generally recommend creating one dataset for each type of media. That means you’ll want one dataset for videos, one dataset for music, one for photos, one for Windows backups, one for Mac backups, one for BSD jails, and a catch-all place for files that don’t fit one of the other categories. 
TYPICAL ZFS STRUCTURE IN A FREENAS MACHINE.
Once you’ve created the datasets, the FreeNAS wizard will help you create the appropriate file shares. By default, most people should choose the CIFS option when it’s time to select the share type. CIFS shares are supported by all the major desktop operating systems, but you will need to enable an AFP share if you plan on backing up your Macs to the server using Time Capsule.
At this point, you should have a working FreeNAS box. Now you need to create a group for all of your users—I called mine “Users” , add users, and add that group to the permissions for each dataset and share.
I heartily recommend FreeNAS as a free (or very inexpensive) solution for a home media server. Alternatively, you can use a commercial Network Attached Storage by following our complete guide to setting up your NAS.
Tip: How to Convert DVD Movies to MP4/MKV for Free?
For DVD fans, Handbrake is no stranger as a free DVD Ripping software. If you just rip DVDs now and then or have no special requirements like editing, adjust parameter for DVD Movies. Handbrake is quite qualified for Rip DVD to MP4/MKF as a DVD converter freeware.
However, if your DVDs are encrypted by CSS, Handbrake is willing to help but unable to do so about this. For protected DVDs, the first thing you will need to do when ripping a movie DVD to MP4/MKV is remove the copy protection. Most discs use a variant of the Content Scrambling System(CSS), but many also use other techniques. Although some DVD-ripping apps, like autoMKV, can bypass copy protection, they are not updated as frequently and aren’t always successful at defeating new copy protection schemes. Your best choice, therefore, is to take use of Pavtube DVDAid that are dedicated to the task.
Continue Reading:


