For Mac users who wish to transfer and play Blu-ray movies on iPhone, iPad or stream to Apple TV, then the most direct way is rip Blu-ray to iTunes readable file format. The following article will show you how to make that realized.
iTunes supported file formats
Before going any further, you should be clear of what file formats can be added into iTunes library.
iTunes supported video formats: MP4, MOV, M4V
iTunes supported audio formats: MP3, AAC, AIFF, WAV, Audible .aa files and purchased M4A and M4P music files from iTunes.
Generally speaking you can play video files with extensions like .mp4, .mov and .m4v. But please note that there are strict limitations on sample rate, codec, etc. If iTunes rejects to play your MP4, MOV or M4V files, check whether the sample rate and codec of these video files are consistent with those that iTunes supports.
Rip commercial Blu-ray movies to iTunes
Obviously, Blu-ray disc is not the supported file format by iTunes, in addition, Sony’s license on Blu-ray disc also makes it difficult to copy data on the disc. Fortunately, here comes Mac Blu-ray Ripper – Pavtube BDMagic for Mac (review), which not only assists you to automatically bypass the Blu-ray copy protection and region codec from Blu-ray disc/BDMV folder/ISO file in the background, but also assist you to directly convert Blu-ray to iTunes readable M4V file formats.
Hot Search: Import MKV to iTunes | Add MP4 to iTunes | Import DVD to iTunes Mac
Rip Blu-ray for iPhone/iPad/Apple TV with best playback settings
Sometimes, even you have get iTunes compatible file formats, you may still encounter problems when you try to sync the files to iPad/iPhone/Apple TV due to the incompatible frame rate, bit rate, channels, resolution, aspect ratio, etc. For advanced users, you can flexibly adjust those settings in the program’s profile settings window to make them fit with your iDevices. For those people who have no ideal how to adjust those settings on your own, no need to worry, our program can do you a great favor to directly output specially optimized profile formats tailored for your iPhone/iPad/Apple TV with the optimal playback settings.
Adjust output video aspect ratio
If the display screen aspect ratio of your iDevices don’t match with the original Blu-ray movies aspect ratio (16:9), you can change output video aspect ratio under the “Crop” tab in the video editor window to make it fit with your iDevices.
Pavtube BDMagic for Mac keeps constant with perfect support for the new macOS Sierra, in addition, it is very stable and there is almost no suddenly crash. In addition, the output file quality generate by this program is almost the same as the original Blu-ray disc.
Step by Step to Rip Blu-ray for iTunes Syncing to iPhone/iPad/Apple TV
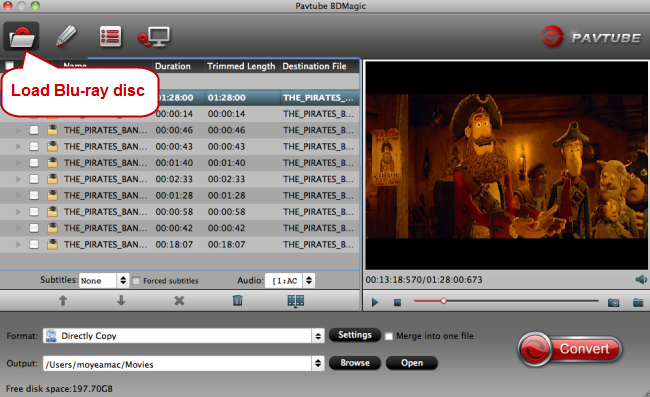
Step 1: Load Blu-ray disc.
Insert the Blu-ray disc into your Mac computer’s Blu-ray drive. If your computer doesn’t ship with a drive, you will need to purchase an external USB Blu-ray drive to read on the data on Blu-ray disc. Then press “File” > “Load from disc” option on the main interface, alternatively, you can also import Blu-ray folder or Blu-ray ISO files with the program.

Tips: Check the movie titles you want to rip. Click the drop-down list of Subtitles or Audio, then all the subtitles and audio tracks info in the Blu-ray movie will be shown clearly, so you can select your needed language as your subtitles freely or desired audio tracks.
Step 2: Specify output profile format.
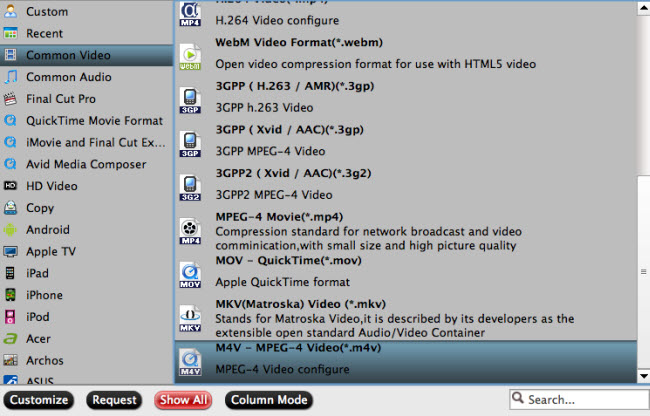
Click “Format” bar drop-down list, choose iTunes best supported “M4V – MPEG-4 Video(*.m4v)” under “Common Video” main category.

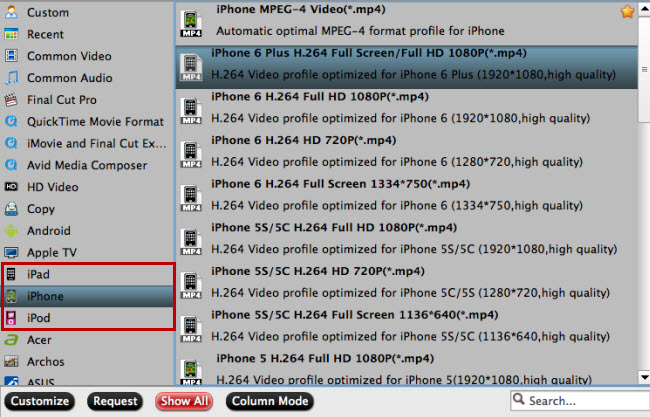
If you wish to sync files to from iTunes to iPad/iPhone/Apple TV, you can get those iDevices best playback settings by flexibly adjusting output parameters including video codec, resolution, bit rate, frame rate, audio codec, bit rate, sample rate, channels, etc to let them fit with your iDevices or use our program to directly output iPhone/iPad/Apple TV preprogrammed profile formats with the optimal playback settings.

Step 3: Adjust output aspect ratio.
Open the “video editor” window, click the “Crop” tab. In the “Crop” window, switch to the “Advanced Mode”. To change output video aspect ratio, there are several aspect ratios for you to choose from, including 16:10, 16:9, 5:4, 4:3, 3:2, and 2:1. Once you select a “Display aspect ratio”, the “green crop frame” will keep this ratio to crop video and you are able to preview the final effect in real time. If you want to keep the same aspect ratio in your final output files, do remember to set the Video “Size (pix)” in “Settings” section as the same ratio as display aspect ratio.

Step 4: Start Blu-ray movie to iTunes conversion process.
After all settings is completed, hit right-bottom “Convert” button to start to rip/convert Blu-ray to iTunes supported file formats or iDevices preset profile format conversion process.
When the conversion is completed, hit the “Open Output Folder” on the main interface to pop out the folder with the converted files. Then feel free to add converted files on iTunes or sync files from iTunes to iPad/iPhone/Apple TV.
Further Reading:
Upload FLV to iTunes for Playing on iPhone, iPad, iPod, ATV
Two Ways of Converting AVI to iTunes on Mac OS Sierra
Watch MKV, AVI, FLV, M2TS(Blu-ray), Video_TS to Apple TV 3 via iTunes
How Do I Get Torrent Movies to iTunes on Windows/Mac?
H.265 to iTunes Converter – Sync HEVC Video to iPad/iPhone/iPod touch
iTunes Solutions: Import MP4/MPEG Videos to iTunes
Convert Xvid/DivX for adding to Your iTunes Library on Mac


