


Instagram offers a simple and convenient way to capture and share the world’s moment. Have some MP4 video files stored on your local computer and wish to upload and share them on Instagram? However, if you are not clear of the best video uploading settings for Instagram, you will inevitably encounter the “video upload error” issues due to the wrong format, codec, frame rate, bit rate, file length or size. The following article will guide you through the process to successfully upload MP4 to Instagram.

Best video uploading settings for Instagram
Size: Maximum width 1080 pixels (height anything)
Frame rate: 29.96 frames per second
Video codec: H.264 codec/MP4
Video bit rate: 5500 kbps
Audio codec: AAC
Audio sample rate: 44.1kHz
Audio channel: mono
Video length limitation for Instagram video
Instagram limits videos to 60 seconds, so make sure your video is 60 seconds or less or it will be cropped automatically. In addition, videos need to be at least 3 seconds long or Instagram won’t let us upload them.
File size limitation: 15MB
Upload MP4 video to Instagram
To get MP4 video smoothly upload to Instagram, make sure that the MP4 video should meet with all the standards listed above. If not, you can get Instagram best video uploading settings with this simple to use program – Pavtube Video Converter Ultimate (best video converter review), which not only facilitates you to transcode unsupported MP4 files to Instagram best compatible H.264 MP4 video codec, but also offer other beneficial profile tweaking settings and video editing features to help you get the exact file formats you want.
To get the proper uploading settings for Instagram, you can adjust the output video codec as H.264, audio codec as AAC, resolution as no wider than 1080p, video bit rate as 5500 kbps, audio sample rate as 44.1kHz and audio channel as mono.
If your MP4 video length is longer than 60 seconds or if there are some parts in the video that you want to remove off, just use the program’s “Trim” function to leave only your wanted parts. If the MP4 video is larger than 15MB, you can either split into small parts by file size, count or length with no quality loss or use the following way to compress it with some quality sacrifice.
– Lower the output video resolution
– Lower the bit rate 20-50% of the default to get small files
– Lower the frame rate of the video to 15 or 10 fps can reduce the file size by as much as 1/2 or 2/3
For Mac users, you can download Pavtube iMedia Converter for Mac to perform the same conversion on Mac OS X El Capitan and macOS Sierra.


Step 1: Load MP4 into the program.Start the program on your computer, click the “Add video” button to import MP4 video into the application. It supports batch importing so that you can add as many video files as you wish.

Step 2. Set output format.
Click on “Format” bar to select Instagram best compatile video format “H.264 HD Video(*.mp4)” under “HD Video” main category.

Step 3:Adjust output profile settings.
Click “Settings” on the main interface to open “Profile Settings” window, here you can flexibly change the output profile parameters to make them adapt with your Instagram uploading settings.
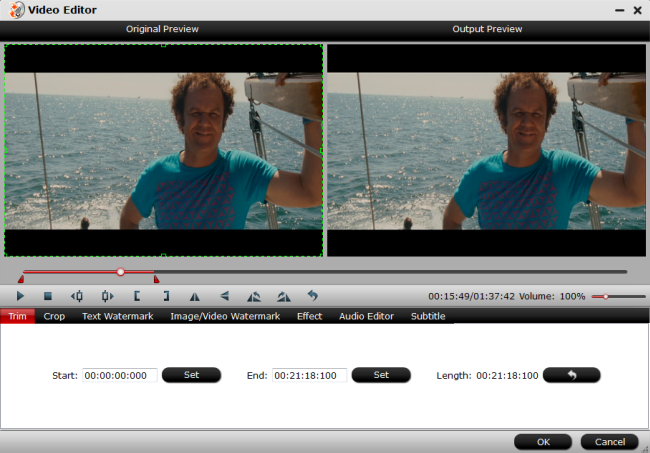
Step 3: Trim video to shorten video length.
To trim mp4 video for Instagram, just open “Video Editor” window and switch to the “Trim” tab, you can drag the slider bars to include the segment you want to remain, click the left square bracket to set start point, and click the right square bracket to set end point when previewing the video or directly input specific values to “Start” and “End” box.
Step 4: Compress MP4 video file size.
Click “Settings” to open “Profile Settings” window, you can change video resolution to a suitable file size, lower the bit rate 20-50% of the default to get small files or lower the frame rate to 15 or 10 fps.
Step 5: Begin the conversion process.
After all setting is completed, hit right-bottom “Convert” button to begin the MP4 video to Instagram best compatible uploading settings conversion process.
How to upload video to Instagram from PC/Mac with desktop application?
As the Instagram app is limited to mobiles only, here are many desktop applications that can fill this gap. Among those computer Instagram videos uploading tools, we recommend you Gramblr (or Bluestacks). This Instagram video uploading works seamlessly on Windows (10), Mac and Linux, allowing users to upload to Instagram from PC/Mac directly without the need of a smartphone! (Instagram doen’t allow third-party uploader, so use it on your own risks) The process to upload videos from computer to Instagram with it is quite simple:
1. Download Gramblr and run it. Sign in to Instagram.
2. Choose the video/photo you would like to upload to Instagram.
3. Gramblr will redirect you to “Caption.” Add a caption if you wish.
4. Click Upload.
Further Reading:


